An Amazon EC2 Instance can be used for many purposes. It can also be used as a server to host websites. It’s basically a VPS. But needs extra configuration to be able to act as a web server due to AWS architecture. I’m going to show you how to launch an Amazon EC2 instance that can later configured with Virtualmin to host your websites.
I’m going to assume you already have an Amazon Web Services account. If you don’t, please go ahead and create an account. It’s free to join. Registration process will include phone verification and payment method verification. It’s also a good idea to get familiar with EC2 pricing structure.
Navigate to EC2 and select a region
Once you’ve logged in to your account, navigate to EC2 from the services menu on the top. Region will be selected as N. Virginia by default. Change it as per your preference.
Launch an Amazon EC2 Instance
When in your desired location, click Launch Instance button to start the process. You’ll be presented with a list of available AMIs. AMI you select here will be the OS of your EC2 instance. Scroll down and select Ubuntu 16.04 LTS (HVM) if you’re following my tutorials to build your server.
Choose an Instance Type
Second step is to select an Instance Type. T2.micro is free tier eligible. But it has poor performance. Amazon itself doesn’t recommend it for production environment. I recommend T2.small for low traffic websites. Select the instance type you want from the list and click Configure Instance Details.
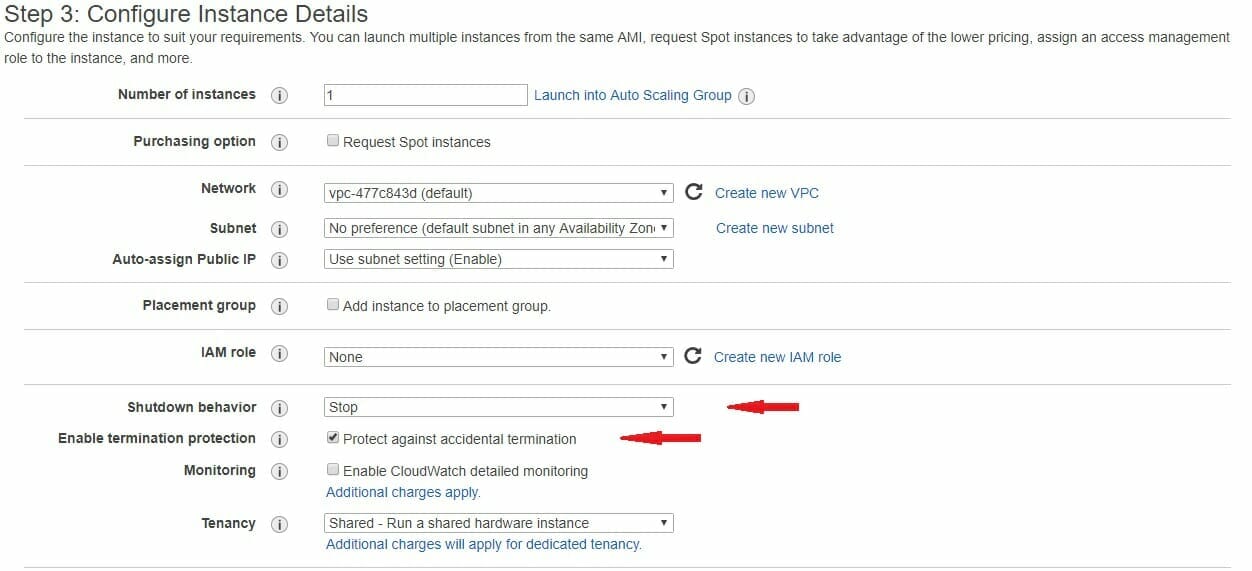
Configure Instance Details
You can leave most options here as default. One setting you must change is Enable termination protection. It disables the terminate button from the console until you disable termination protection. And it’s a good idea to set Shutdown behavior to Stop as well.
Add Storage
Step 4 of launch an amazon ec2 instance process is adding storage to your instance. Charges for storage isn’t covered on EC2 pricing. You’ll be charged a separate fee for storage you add here. However, free tier includes 30GB of free storage. And it’s a good starting point. You can always add more storage volumes later.
Add Tags
It’s safe to ignore this section. But I usually create a name tag with the main domain I’m planning to host. This is great for identification purposes.
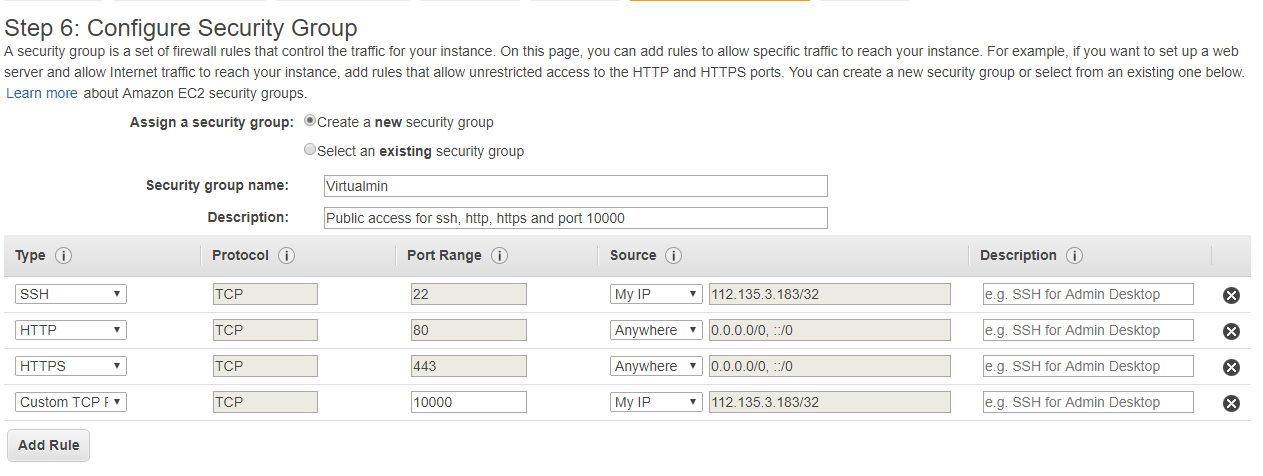
Configure Security Group
Probably the most important part of the launching process. You get to create your EC2 security group here. Security group controls how your EC2 instance communicate with the world. You can allow or block access to your instance using security groups.
Make sure Create a new security group is selected and give it a friendly name. I’ll call it Virtualmin. Type a little description, may be describing which ports are allowed. Talking about ports, you’ll need port 22, 80, 443 and 10000 open for this EC2 instance to serve as a web server. SSH will be added already. Add the other ports as below.
Virtualmin and services it install use few other ports. All of them are listed on List of Virtualmin Ports topic. You can review and add them as you need.
Review Instance Launch
Nothing much to say here. Review all the options you selected so far and click Launch.
Create a new key pair
Passwords are disabled on EC2 instances by default. Authentication between you and EC2 instance will be done using a SSH key pair. A pop up will appear asking you to select an existing key pair or create a new one. If this is your first time creating an EC2 instance, you probably won’t have a key pair. So create a new one. You’ll be able to launch the instance after downloading the key file.
Keep the key file safe as you’ll need it to login to your server. That concludes the instructions to launch an amazon ec2 instance. It’ll take a minute or two for your instance to be available. In the meantime, allocate an Elastic IP address to your account with your instance as it’s an important requirement for Virtualmin and any web server.