
Ubuntu 16.04 now ships with Nginx v1.10, PHP v7.0 and MariaDB v10.0.36. I had only got Nginx v1.4.6, PHP v5.6 and MySQL v5.7 with my old Virtualmin-Nginx setup on Ubuntu 14.04 LTS. That right there is a good reason to upgrade. I’ve tested this setup on my server and its working. It’s working great. You’ll clearly see performance improvements of your website.
And I’m sure you all heard about PHP v7.3 and how it’s so much better and faster than previous versions of PHP. Now you can enjoy its benefits on your server. And MySQL is gone. Instead Ubuntu 16.04 comes with MariaDB. But unfortunately Virtualmin still uses MySQL. But don’t worry, we’ll replace MySQL with MariaDB. There are so many good things to say, but I think we should get to the installation.
I’m going to assume that you already have a VPS with root access. If you don’t, you can get one from a unmanaged VPS provider I recommend. Logged in to Ubuntu 16.04 server as root user, run following command to check your server’s hostname.
hostname -f
If the output is anything other than your domain name or a sub-domain, you should change it before you install Virtualmin with nginx. Refer to change Ubuntu 16.04 hostname from command line tutorial and change it now.
Add Ondřej Surý Repo to the server
Ubuntu 16.04 comes with PHP v7.0. Which isn’t the latest version of PHP available. For that reason, we’re going to use Ondřej Surý’s PHP repository to get the latest version of PHP. Ondřej Surý is a well known Debian Developer. Using his repositories will allow us to install the latest version of PHP on our system or even have multiple PHP versions running at the same time if need to. Following command will add ondrej/php PPA to the system.add-apt-repository ppa:ondrej/php
Trouble with add-apt-repository?
We will also add ondrej/nginx PPA to the system so we can get the latest nginx version.
add-apt-repository ppa:ondrej/nginx
Update apt cache,
apt update
apt upgrade
Install Virtualmin with Nginx
This part is similar on all Linux distributions. Download the Virtualmin installation script to your server,
wget http://software.virtualmin.com/gpl/scripts/install.sh
Run the script to install Virtualmin with nginx.
sh /root/install.sh -b LEMP
You’ll be asked to confirm the action. Confirm it and Virtualmin installation will begin. It’ll take few minutes for the installer to complete. It’ll setup Nginx v1.16, PHP v7.3 and MySQL v5.7. You’ll be asked for permission to a swap file if your server has less than 1GB of RAM. You’ll be greeted with following message on your Putty screen when Installation completed.

Install Additional PHP 7.3 Modules
Due to the ondrej/php PPA we added earlier, Virtualmin script installs all major PHP versions on your server by default. But for this tutorial, we will use PHP v7.3 only. If you need PHP version other than PHP v7.3, you can follow my instructions to use multiple PHP versions on your server. Since PHP v7.3 is already on your VPS, you only need to install few PHP modules on your server for most php applications to work. Following command will install essential PHP v7.3 modules on your server.
apt install memcached php-memcache php-pear php-imagick php7.3-cgi php7.3-mysql php7.3-curl php7.3-gd php7.3-imap php7.3-tidy php7.3-xmlrpc php7.3-xsl php7.3-mbstring php7.3-zip php7.3-cli
Now you need to make sure server is using correct PHP version for the command php. If your php application requires setting up cronjobs, this step is mandatory, or your application will misbehave.
update-alternatives --set php /usr/bin/php7.3
This command sets PHP 7.3 for PHP-CLI.
Replace MySQL with MariaDB
Virtualmin installs MySQL on the server by default. But I like to use MariaDB for my databases. MariaDB is a drop-in replacement for MySQL and is considered as an improved version of MySQL. So let’s remove MySQL. First stop MySQL,
service mysql stop
Remove MySQL,
apt-get remove mysql-server mysql-common
Install MariaDB,
apt-get install mariadb-server
That’s all you have to do to replace MySQL with MariaDB. Now Secure MariaDB.
Securing MariaDB Databases
There is more you can do to secure MariaDB databases. But at this point, running following command will guide you through changing some dangerous default settings. My input for the first question was No and Yes to everything else. It’ll also ask you for a new MariaDB password. You don’t need to change it here just type the same password you set on Virtualmin post-installation wizard.
mysql_secure_installation
Complete Virtualmin Post-Installation Wizard
You can access Virtualmin on following URL with your root password. Make sure you replace example.com with your domain name. Your DNS should be propagated for this to work. If DNS isn’t propagated yet, you can replace example.com with your server’s IP address.
https://example.com:10000/
You’ll be taken to the Virtualmin Post-Installation Wizard after the login. It is pretty self-explanatory, just remember to select MySQL/MariaDB as database server and Only store hashed passwords as password storing method. You’ll be good with default selections for all other steps.
You’ll be given an option to check Virtualmin configurations after the Post-Installation wizard. Click Recheck and refresh configuration button to check your server for errors. The most common error I’ve encountered was system is not setup to use itself as a DNS server. If everything goes well, you’ll be greeted with .. your system is ready for use by Virtualmin.
Set default PHP version for Virtualmin
The default PHP version configuration for Virtualmin is set to “Highest Available” by default. This is not an ideal setting for us since we’ve configured PHP v7.3 for CLI. you can change this easily from Virtualmin > System Settings > Server Templates > Default Settings > PHP Options. A drop down list of available PHP versions will be shown to you.
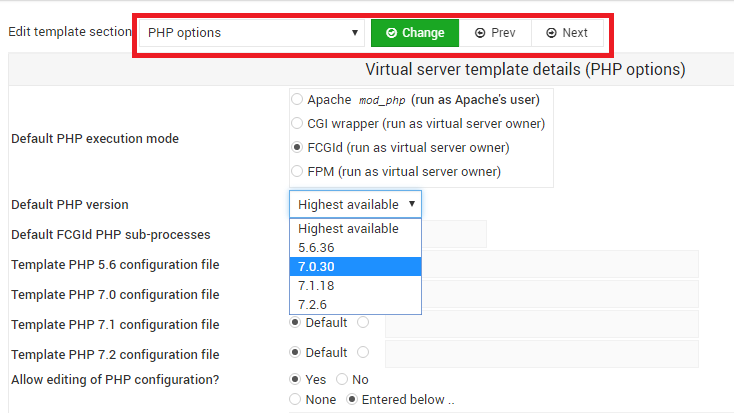
Select PHP v7.3 and click save. Now PHP v7.3 will be used for all newly created servers.
What's Next?
That concludes Virtualmin-Nginx installation on Ubuntu 16.04. Your VPS is now fully configured to host websites using Nginx as the web server.


Didnt had so couldnt remove
DAV Login
Mailman
Subversion repositories
Why AWstats reporting needs to be removed for nginx?
I have only on fresh system now as of today installed only theese plugins
BIND DNS domain
Mail for domain
Apache website
Webalizer reporting
SSL website
Log file rotation
MySQL database
PostgreSQL database
ProFTPD virtual FTP
Spam filtering
Virus filtering
Webmin login
AWstats reporting
Nginx SSL website
Nginx website
Protected web directories
On system info Status showing up
BIND DNS Server
Postfix Mail Server
Dovecot IMAP / POP3 Server
ProFTPD FTP Server
SSH Server
MySQL Database Server
Nginx Webserver
AWstats reporting won’t work without Apache.
Hey, I’m going through your steps after setting up a VPS Ubuntu on Google Cloud.
I’ve went through all the steps yet I can’t access my server using my IP address and port 10000.
In your explanation, you say that the hostname should be the domain name, but this server is not a website, I strictly want it to use Prosper202, so I’m trying to follow your steps to do that.
During the installation process of Virtualmin, It asked me for my fully qualified domain name. I didn’t really have one so I just made one up.
I have a feeling this could be a problem why I can’t connect to my system to go through the Post-Installation Wizard.
I’ve made sure all firewalls are off, ive restarted the system, and I’m trying to connect directly to the instance with
https://[IP Address]:10000What else could I do to troubleshoot why I can’t connect?
Thanks for all your help!
Prosper202 needs a domain name or subdomain. You can use that same domain as FQDN for Virtualmin. It’s important to correct that. But that’s not the issue here.
I haven’t used Google Cloud. But I have the feeling that there may be some sort of firewall on there network. Like that’s on AWS. Otherwise you should be able to connect on IP address regardless of FQDN.
And this tutorial along will not be sufficient to get Virtualmin working on Google Cloud. You’ll have to configure networking on Virtualmin after post installation.
Hello,
Thank you very much for your Help!
What about MariaDB running on Virtualmin + nginx ?
Thanks!
It’ll work. But since Virtualmin automatically installs MySQL, you’ll have to remove it manually and install MariaDB. And then you will need to configure Virtualmin to use MariaDB instead of MySQL.
How do we do that, can you please clarify the commands?
This worked for me.
Run the following commands before ‘Running Virtualmin Post-Installation Wizard’:
apt-get remove –purge mysql-server mysql-client mysql-common
apt-get autoremove
apt-get autoclean
apt-get install mariadb-server
source: https://askubuntu.com/questions/531455/how-to-drop-in-replace-mysql-with-mariadb
I keep getting errors such as –
E: Unable to locate package webmin
E: Unable to locate package usermin
E: Unable to locate package procmail-wrapper
E: Unable to locate package scponly
.
.
.
FATAL – Fatal Error Occured: Somthing went wrong during the installation.
How can I get this to work?
Try running
Now I get an error
Fatal error: Uncaught Error: Call to undefined function mb_strtolower()
when I try to activate one of my WP plugins.
“Running Virtualmin Post-Installation Wizard”
Iam not able run this or vist thepage
Hey Naveen, need more information than that. Do you see an error message?
I have beentrying to get virtualmin working for many hours many attempts over the last week or so, trying several tutorials, researching issues on the virtualmin forum (which BTW as a GPL user I’ve had zero replies after 3 or 4 posts there) and now I’m trying your approach.
I’ve been using Debian 8, but the Linux distro isn’t all that important to me so thought I’d go with your example.
Virtualmin basically ignored the nginx server and configured everything based on apache2, even tho I did exactly as you instructed here. I made sure apache was NOT set to run at boot time and I set the nginx options properly, then I rebooted and proceeded to create the virtual server. Before I setup Worpress I went to the server’s URL and the default apache page came up, despite there being nothing other than the stats folder inside the /home/myDomain/public_html folder. I then looked at /etc/nginx/sites-available/ folder and the only config was default, none for the domain.
I realize that virtualmin’s nginx support is still in beta, but after at least 10 different attempts to get Worpress installed with nginx under Virtualmin and still no success, I’m about to throw in the towel. I’m not impressed with the variability of issues and inconsistencies I’ve encountered.
I went so far as to create a script to automate this tutorial’s instructions up to the point where you login to Virtualmin, setting hostname, doing update / upgrade, adding swap and tweaking sysctrl to optimize inodes and swapiness, so after I reset the VPS and upload my script I start it and return in 30 minutes to check the log it produces for errors before I login and run the post install wizard.
I think I am going to modify my script to also remove the apache2 package as the last thing done before the script reboots the VPS, but I suspect Virtualmin will still default to Apache despite it not even existing on the system. Virtualmin’s nginx support is just not ready for release. It’s not so much the new nginx modules are the problem as Virtualmin itself, at lease that’s my opinion.
I’m sorry you’re having lots of trouble with the configuration. But the Apache’s default page is just a HTML page. It does not mean that Apache2 is running. I can see why this is so confusing. If nginx is configured to use same directory as Apache for default directory, it’ll serve files in that directory. I think this is the case here. NGINX could be serving Apache’s default page. And the page is still saying Apache.
Not likely, since the default doc root for nginx is /usr/share/nginx/html. Although setting the owner to domain.www-data works, what **should** it be, domain.domain_group, or domain.www-data, and does the group matter?
I shouldv’e said, “does the group matter to Virtualmin”. Of course the group matters, especially for security.
I FINALY figured out my issues are related to the WordPress website I’m trying to migrate. When I run the WordPress installer as your tutorial instructs there are no issues and it works just fine.
I also finally got my site migrated. The owner needs to be the domain and group www-data, whereas both owner & group were www-data on old VPS.
Glad to hear that.
Maybe wasn’t available when you did this but install NGINX directly with
sh /root/install.sh –bundle LEMP
Hi, I have completed all of the steps but when I go to my sub domain, sendy.mydomain.com I get a “welcome to Nginx” page. If I go to sendy.mydomain.com/10000 I got a blank page. What is going on? I
Hi Laszlo,
Please create a topic on our server administration forum so I can help you get this sorted.
Hi Tharindu
Thanks for your guide. I went through all 4 steps for setting up in google cloud.
Everything went smoothly but i have a silly question – what is the username and password for the webmin login page?
chris
Hi Chris,
It’s explained in step #3 of Virtualmin GCP tutorial.
Hi. Tharindu
Every time i stop my Ec2 instance i cannot access it afterwards. it’s showing me connection time out. so i’ll have to do the whole process again .can you give me the solution to this problem. And also i cannot use my Webmin by using root user . plz help me out.
Are you using an Elastic IP address?
Erorrs installing on 18.04
https://forum.virtualmin.com/t/some-errors-with-timeout-and-setting-up-installation-18-04/104869
Yes, I couldn’t get MariaDB to work with Virtualmin on Ubuntu 18.04 either. It’s the reason why I’m still sticking with Ubuntu 16.04 which is working great.