
WordPress is currently the most popular CMS in the world. Millions of webmasters use it to create their websites. It is newbie friendly and has a very simple installation process. But things get little complicated on unmanaged VPS. If you’re planning to use an unmanaged VPS, you can use instructions on this page to install WordPress on Ubuntu 16.04 VPS with Virtualmin & Nginx
The WordPress setup this tutorial produce is focused on performance. We’ll be building a high performance web server with Virtualmin v6.03 GPL, Nginx v1.16, PHP v7.3 and MariaDB v10.0.36. It’s a well known fact that WordPress is faster on nginx. And Virtualmin gives a nice GUI to manage your VPS.
Hire me and have your WordPress ready within 24 hours!
Get WordPress Installed
Prerequisites
This tutorial requires you to have a Ubuntu 16.04 VPS. Which you can get from one of my recommended VPS providers. And then complete following steps,
Completing those steps build the environment for WordPress on your VPS. You may ignore optional steps. But I recommend completing them prior to installing WordPress.
Download WordPress
Assuming you have everything above in place , you can now install WordPress on your domain or subdomain. But to do so, you need to login to your VPS with domain’s admin user. Not the root user. Once logged in, run following command to change the current directory to domain’s web directory,
cd $HOME/public_html
Following commands will download and extract WordPress package,
wget http://wordpress.org/latest.tar.gz
tar --strip-components=1 -xvf latest.tar.gz
rm latest.tar.gz
WordPress should be ready to install now. But there’s one more thing we should do before installing it.
Add Nginx Rewrite Rules for WordPress
WordPress needs custom nginx rewrite rules for pretty links to work. You should add these rules to nginx configuration file for the domain. This needs to be done with the root user account of your VPS. So switch root account and open Nginx virtual host file for the domain,
nano /etc/nginx/sites-available/example.com.conf
Replace example.com with your domain name. Look for following line within the file (Ctrl+W).
fastcgi_param HTTPS $https;
Add this rule BELOW it,
location / {
                try_files $uri $uri/ /index.php?$args;
        }
File should look like this,
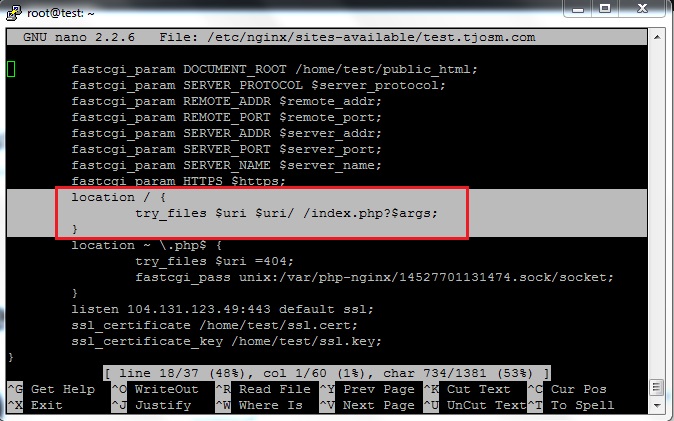
Hit Ctrl+X to save changes and close the file. Finally restart Nginx,
service nginx restart
Your server is now fully configured for WordPress. You now run the WordPress install to complete the installation.
Install WordPress
This is where you actually install WordPress with Virtualmin & Nginx. Open your domain name in browser. You’ll be asked to select the language for your WordPress installation. Select it and continue till you see this page.
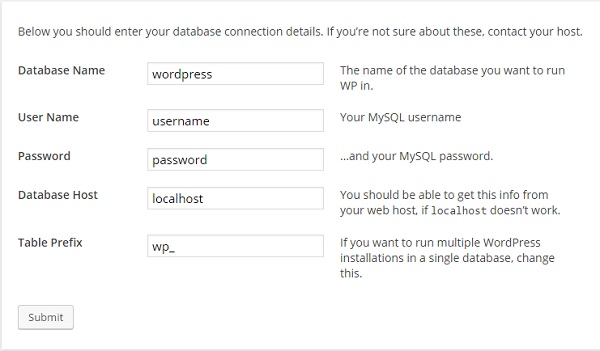
Database name and username will be same as your admin username in most cases. You can find MySQL password in Virtualmin. Refer to Obtaining MySQL credentials for a domain from Virtualmin.
Copy password to the WordPress installer and click submit. You don’t need to change anything else on that page. Hard part of the installation is now over. Continue the final steps of the installer and complete the installation.
That concludes the instructions to install WordPress on Ubuntu 16.04 VPS with Virtualmin and Nginx. Create a topic on sysadmin forum if you have issues with the installation.

I am trying to install WordPress on local server using WAMP. I am not able to install it due to database issue. Is there any easy alternative like softaculous available for WAMP?
I’m sorry, I’m not able to help you with WAMP.
Other pages and posts work but the homepage is blank, please help.
Hey,
thanks for all these useful guides!
One point I’m missing, where can I find the key to connect ssh with the domain’s admin user? I only have the one created for the root.
There’s no SSH key for that account. You have few options though,
* Login to root and switch to admin user with following command,
su username* Enable password authentication
* Generate new SSH key for a user (I haven’t covered this one yet)