If you are a developer of a software or a creator of a product, more often than not you’ll have to deal with bugs in your product. While coming up with patches and fixes are entirely up to you and your team, you need a proper way to report, assign and track bugs. This is where MantisBT comes in. This tutorial will show you how to get MantisBT v2 up and running on a Ubuntu 20.04 VPS.
MantisBT is a web based bug tracking software with powerful features and great support. It’s built with PHP and free to use. It’s open source and released under GNU General Public License. You can find more information about Mantis Bug Tracker on their official website.
This tutorial will show you how to install it on a Ubuntu 20.04 VPS. The latest version of MantisBT is compatible with PHP7 and it works perfectly with nginx. The instructions below will work for any server with php and nginx, but only tested with PHP v8.0, Nginx v1.22 and Virtualmin v7.1 GPL.
If you don’t have your VPS configured with Virtualmin, PHP7 and nginx, please follow my tutorial to get your VPS configured and create a virtual server for your domain before following below instructions. I’m going to assume you’ve done both and your VPS is already configured to host websites. And if you don’t have a VPS yet, you can get one from my recommended VPS providers. You should have at least 1GB of RAM VPS for MantisBT v2 to function properly.
 Not a tech guy? Rather have a freelancer install Mantis Bug Tracker for you? Who’s better than the guy who wrote this tutorial!
Hire me and have your MantisBT ready within 24 hours!
Get MantisBT Installed
Install MantisBT v2 on Ubuntu 16.04 VPS
Start by login in to your VPS with administrative user account for the domain. And navigate to public directory. Issue following command on Putty with changing AdminUser with your username.
cd /home/AdminUser/public_html
Download latest version of Mantis Bug Tracker which is v2 at the moment of writing.
wget https://sourceforge.net/projects/mantisbt/files/mantis-stable/2.0.0/mantisbt-2.0.0.tar.gz/download -O mantisbt.tar.gz
Extract the downloaded file,
tar --strip-components=1 -xvf mantisbt.tar.gz
Now open your domain in a web browser. You’ll be redirected to the web installer of MantisBT. Web installer will be at following URL if you want to open it directly.
http://example.com/admin/install.php
You’ll see pre-installation screen of MantisBT. It should look similar to this image.
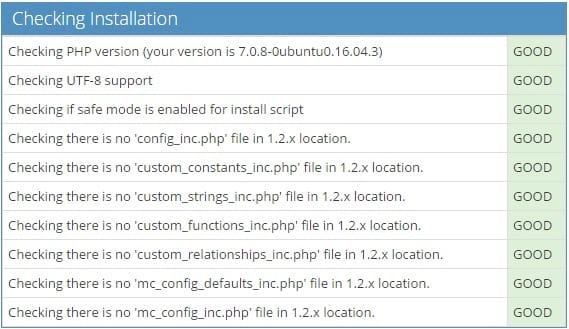
If you see red flags, it means there’s something wrong with your server. You need to fix it before going to the next step.
Scroll down if you don’t see any reported errors. You’ll reach the part where you can perform the installation. You only need to change following fields. Don’t touch anything else unless you know what you’re doing.
- Username (for Database): Administrative username
- Password (for Database): MySQL Password of administrative user*
- Database name (for Database): Administrative username
- Default Time Zone: Select your timezone
Click Install/Upgrade Database button after filling required information. MantisBT v2 will be installed on your domain with default username administrator and password root. Login and change your password to a more strong one.
Finally let’s delete the admin directory to complete the installation as keeping it on the server is insecure.
rm -rf /home/AdminUser/public_html/admin
That’s is. You have a latest version of MantiBT installation on a highly optimized hosting environment.