
Virtualmin has the ability to manage your domain’s DNS when properly configured. But it’s optional, you can use your domain registrar or third party services like CloudFlare to host your DNS. In any case, there a bug on some Ubuntu systems that prevent Virtualmin from mapping domains inside your VPS. This post intend help you fix it for good.
So I was setting up a new server for a client with Ubuntu 16.04, Virtualmin and Nginx. Server’s DNS was managed by DigitalOcean itself. But where DNS is hosted does not play a part in this case. I tried to enable Nginx modules in the Features and Plugins after running Virtualmin post-installation wizard. But it failed with following error.
Failed to save enabled features : Virtualmin is configured to setup DNS zones, but this system is not setup to use itself as a DNS server. Either add 127.0.0.1 to the list of DNS servers, or turn off the BIND feature on the module config page.
As you can see, Virtualmin gives possible solutions along with the error. This can be easily fixed by adding 127.0.0.1 to the list of DNS Servers. But unfortunately that doesn’t work. Changes you make to the list of DNS servers does not get saved. It won’t even give you an error message.
The other solution Virtualmin suggest is to disable DNS server. That won’t work for me since Virtualmin will then fail to serve domains from it’s home directory and serve pages from Ubuntu’s default html directory. This will result in an Apache default page on your domain although you have NGINX installed.
This error is caused by DHCP. DigitalOcean uses DHCP to assign IP addresses to droplets. And while obtaining the IP address for your server, DNS servers provided by DigitalOcean are used by DHCP server instead of what’s currently setup on your server. This is the reason why you couldn’t add 127.0.0.1 to the list of DNS Servers. It gets overwritten.
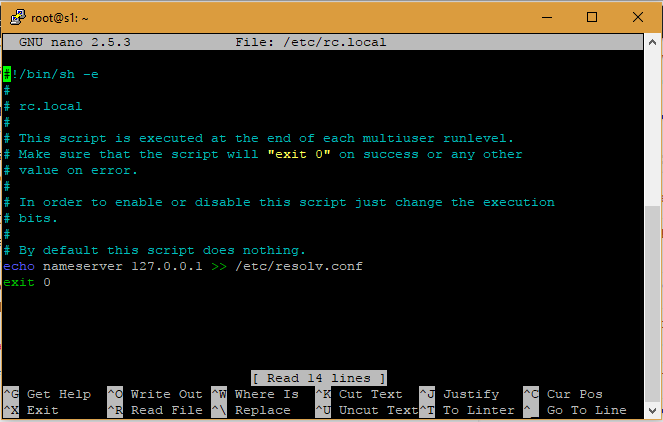
I could fix this by adding 127.0.0.1 to the /etc/resolv.conf (list of DNS Servers) file from command line. But it gets overwritten on each server boot-up. What if I can add 127.0.0.1 to the /etc/resolv.conf file on each boot-up? that’s exactly how I’m going to fix this. You can use /etc/rc.local to add peace of code that adds 127.0.0.1 to the /etc/resolv.conf file on each boot-up. So open your /etc/rc.local file from command line. You need to be root user to do this.
nano /etc/rc.local
Now paste following file before the line that reads exit 0
echo nameserver 127.0.0.1 >> /etc/resolv.conf
File should look like this after the change,
Save rc.local file with the change and reboot the server,
reboot
Error should be fixed now.


This does’nt work
I’m sorry. But it does work.
This worked like a charm, thanks! My configuration was pretty much the same: Virtualmin on Ubuntu 16.04 but all hosted in AWS.
And I did have my DNS pointed to my own domain providers so I guess I could have also disabled BIND DNS module, right?
Hi Franck,
Yes, you can disable DNS module. But you need to disable DNS features for each domain before doing that.
thanks bro it worked… it really save me ..
Ahh, as in looking for a needle in a haystack and, I found it right here. The needle that is. Thank you indeed for making this resource available – this together with the rc.local file fix.
I have Webmin/Virtualmin atop Ubuntu 18.04 LTS. This fixed up the Virtualmin 127.0.0.1 issue.
For others and, depending on reference/tut sources, here’s a pointer to another common Virtualmin setup issue – referring to specifically to MySQL issues – https://www.virtualmin.com/node/8741.
Thanks again