Amazon EC2 instances and Google VM instances come with root account disabled by default. They also use a PEM key file to authenticate the user so the use of passwords are also disabled. While these are excellent practices in terms of security. Some people prefer to have these disabled for many reasons. Let’s enable root account on AWS EC2 and Google VM instances
passwd
However, you’ll still have to use key file to login to EC2/VM instance with SSH. You can follow this tutorial if you prefer password logins. And want to login to server as the root user.
Please note that these instructions are for Ubuntu 16.04 instances. But it should work on other Ubuntu versions as well.
Login to your EC2 instance with standard user account. This could be ubuntu or ec2-user depending on the AMI you deployed on your instance. Once inside, switch to root account by executing this command.
sudo -i
Now open the SSH configuration file with nano text editor.
nano /etc/ssh/sshd_config
Enable Root Account on AWS EC2/Google VM Instance
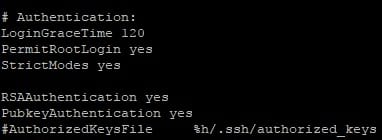
Search for following line within the file (Ctrl+W),
PermitRootLogin
Now change PermitRootLogin to yes. File should look like this after the change.
Root account will be enabled on your instance after SSH service restart. But you still can’t login to root account because you don’t have password logins enabled on your server. You can enable it by following below instructions.
Enable Password login on AWS EC2/Google VM Instance
Now search for following line within the configuration file,
PasswordAuthentication no
Change no to yes. File should look like this after the change.

Now close the file and reload SSH service.
service sshd reload
Password login should be enabled now. You can now set a password for root account. Use following command on Putty to do it.
passwd
Root account is now enabled on your EC2/VM instance and you can login to it using the password you set above. And finally, your instance is ready for Virtualmin. Go ahead and Install Virtualmin Control Panel on this AWS EC2/Google VM Instance and start hosting websites.